Now you all can invite me on skype for any kind of help required as my username is krackoworld


Showing posts with label Windows Xp Secrets. Show all posts

18 June 2012

Top 10 reasons why your PC Sucks


pc crashs10 reasons why PCs crash- U must Know:

Fatal error: the system has become unstable or is busy," it says. "Enter to return to Windows or press Control-Alt-Delete to restart your computer. If you do this you will lose any unsaved information in all open applications."

You have just been struck by the Blue Screen of Death. Anyone who uses Mcft Windows will be familiar with this. What can you do? More importantly, how can you prevent it happening?


03 February 2012

How to Hack Admins Password in Simple Way


hack administrator passwordPS: This post is an alternate and easy way for hacking Windows admin password in just few steps given below. You can also read our previous post on Cracking Windows password using Ophcrack. Now a days people are becoming very smart and always lock their items via giving Windows a password for the security. Therefore to break that security today KrackoWorld has brought you some cool tricks which will surely work. Hence sit down and read the entire post very carefully.

Procedure for Hacking Windows Administrators Password:

1. First of all Restart your computer.
2. While booting, press F8 and select "Safe Mode" properly
3. After getting to the user menu. Click on a user and this time it will not ask you for a password
4. Go to Start>Run and type "CMD" (without the quotes).
5. At command prompt type in "cd C:WindowsSystem32" (without the quotes), I am assuming C is your System/Windows Drive
6. For safety purposes first make a backup of your Logon.Scr file.. You can do this by typing in "Copy to Logon.scr to Logon.bak" (without the quotes)
7. Then type "copy CMD.EXE Logon.scr"(without the quotes)
8. Then type this command, I will assume that you want to set Administrator's password to "MyNewPass" (without the quotes)
9. Now, type this in (I am assuming that you are still in the directory C:WindowsSystem32) , "net user administrator MyNewPass" without the quotes
10. You will get a message saying that it was successful, this means Administrator's new password is "MyNewPass" (without the quotes)
11. Restart the PC and you will login as Administrator (or whatever you chose to reset) with your chosen password.

About the Guest Author:

This article is written by Tushar Patel who is a Ethical Hacker and bloggist as well. You can check his blog at here about Hacking tricks.

That’s it! Enjoy…


29 December 2011

Advices on How to Uninstall any Software Properly


Simple Tips for Uninstalling Any Software

Sometimes, it is necessary that you remove any software from your system, which you are not using anymore, to get some free space for new software. You always need to install any software before you start working on it, and if you install some new software, then it must not interfere the working of other programs.

Why Uninstalling Software is Necessary?

It is very important that you uninstall software that you are not using, because, if you keep those files, they may also corrupt other files and make your system performance slower and slower. By uninstalling unused software, you can speed up your PC.

When any program is installed on your PC, many changes are made i.e., space is reserved for the addition of new entries into the windows registry etc. Therefore, when a program is uninstalled, lots of changes are made in the system, the same way as done by the installation of any application. And, it is sometimes, difficult for simple computer user to keep track of all these changes. So, for these types of users, third party tools are available in market that offers big ease to them.

There are many companies available that are offering such software installers or uninstallers to provide users the ease of operation.  An uninstaller is a third party program that exactly knows where installed software had made changes. You can specify while using these software the kind of un-installation you want; partial or complete. If you select complete, then it will completely remove the installed files from your system and vice versa. Similarly, there are also such software apps available that provide their own uninstallers along with installers.

How Uninstalling Software Works?

Uninstaller software keeps track of all the software installed on your machine; the changes they made in the registry of your system, in the form of logger. And, in the logger, some lists are available along with all the actions you need to perform at the time of uninstalling a program. These software applications are designed to reverse the installation process. The advantage of this type of software is that there is no chance of mistake that you can commit while uninstalling any software manually.

There is also some supplementary tool facility available in these apps. These supplementary tools in an uninstaller perform little tasks like removing browser history and maintaining backup of your data. Using software uninstaller is considered the safest way to remove any software properly.

  • Backup Windows Registry: It is always suggested that before uninstalling any software, you must keep back up of your windows registry files, because it will save you from many problems.
  • Never Install Any Software, If you are not sure how to uninstall: You should always use such software that have authorized signatures and provide your complete installation guide.
  • Check Reviews: Do not forget to check reviews before choosing any uninstaller, because, there are many such programs available that uninstall any software, but, in the end, they create problems for your computer. Such software is very harmful for your system. Therefore, you should consult software reviews.

This article has been written by our Silver star guest author Tim Edmonds


19 August 2011

Crack Windows Password Easily Via Ophcrack


Now a days cracking Windows admin’s password is just like playing the games of children because many software's and sites comes into action to do this. Therefore today I going to teach you how to crack windows passwords using Ophcrack by just installing software or by running a live bootable cd also. So first let me clear you that Ophcrack is a free Windows password cracker based on rainbow tables. It is a very efficient implementation of rainbow tables done by the inventors of the method. It comes with a Graphical User Interface and runs on multiple platforms. Note- This process mainly works on Windows Vista or XP only.

Features -

  • Runs on Windows, Linux/Unix, Mac OS X and much more.
  • Cracks LM and NTLM hashes also.
  • Free tables available for Windows XP and Vista.
  • Brute-force module for simple passwords.
  • Audit mode & CSV export.
  • Real-time graphs to analyze the passwords.
  • LiveCD available to simplify the cracking.
  • Loads hashes from encrypted SAM recovered from a Windows partition, Vista included.
  • Free and open source software (GPL) etc..

Steps Needed to do -


Step 1: Go to ophcrack.sourceforge.net select Windows Vista or XP and download the ISO file. After the download is complete burn the ISO to a CD or DVD.
Download
Step 2: Restart your computer (with the CD in) and your computer should now boot from the live CD into a Linux environment.
Step 3: Ophcrack will automatically run as soon as the CD boots and now all you need to do is wait until Ophcrack has completely finished cracking the computer password(s). This process will take anywhere from 10 minutes to several hours depending on the strength of the password used to protect the computer.

Here is the screenshot of it -

Step 4: Finally now that you know the computer password; reboot the computer, eject the CD and enter in the password.

That's it! Now you'll have complete access to everything on the admin’s computer by knowing his/her password and you can go ahead and remove parental controls or do whatever you'd like.

If anyone have some problem regarding it then plz Comment below.


28 November 2010

Disabling Right Click


1. From the Start menu, select Run. 
Type gpedit.msc and click OK.

2. Get to this location:
User Configuration > Administrative templates > Windows Components > Windows Explorer

3. In the right pane double click on :
Remove Windows Explorer's default context menu

4. Select Disable and click OK.


Do Not Misuse it...

21 November 2010

Folder Option Missing


 Many of us sometimes find the folder options missing in windows explorer due to some virus or trojan effect.
Here's the solution-->

Open Run and then type "gpedit.msc".
Now goto User Configuration > Administrative templates > Windows Component > Windows Explorer.
Click on Windows Explorer you will find the 3rd option on the right side of screen "Removes the Folder Option menu item from the Tools menu"
Just check it, if it is not configured then change it to enable by double clicking on it and after applying again set it to not configured.

I hope that you will find the option after restarting windows..


Enjoy----

20 November 2010

Changing FAT-NTFS


To convert a FAT partition to NTFS, perform the following steps.


  • Click Start, click Programs, and then click Command Prompt. In Windows XP, click Start, click Run, type cmd and then click OK.
  • At the command prompt, type CONVERT [driveletter]: /FS:NTFS. Convert.exe will attempt to convert the partition to NTFS.
NOTE:=
Although the chance of corruption or data loss during the conversion from FAT to NTFS is minimal, it is best to perform a full backup of the data on the drive that it is to be converted prior to executing the convert command.


19 November 2010

All Xp RUN Commands


Here are the all run commands of windows Xp which can be directly accessed by going through the START/RUN.


Install Xp in 15 Mins


INSTALL WINDOWS XP FASTER


Install Windows xp in less than 15 minutes
yes friends its true

This trick will be very helpful for those who frequently install windows xp operating system. Normally OS installation takes around 40 minutes to complete, but through this trick you can now save 10-15 minutes.
steps are :
1. Boot through Windows XP CD.

2. After all the files are completely loaded, you get the option to select the partition. Select “c”.
3. Now Format the partition, whether it is normal or quick with NTFS or FAT
4. Once the formatting is completed, All the setup files required for installation are copied. Restart your system by pressing Enter.

Now begins the Simple trick to save your time .
5. After rebooting, you get a screen where it takes 40
minutes to complete or finalize the OS installation.
6. Now, Press SHIFT + F10 Key -> This will open command prompt.
7. Enter “Taskmgr” at the command prompt window. This will open Task Manager.
8. Click the Process Tab, here we find a process called Setup.exe -> Right Click on Setup.exe -> Set Priority -> Select High or Above Normal. Initially it will be Normal.
thats it done!!!!


All Keyboard Shortcuts


100 Keyboard Shortcuts for Windows


100 Keyboard Shortcuts for Windows-

CTRL+C (Copy)
CTRL+X (Cut)
CTRL+V (Paste)
CTRL+Z (Undo)
DELETE (Delete)
SHIFT+DELETE (Delete the selected item permanently without placing the item in the Recycle Bin)
CTRL while dragging an item (Copy the selected item)
CTRL+SHIFT while dragging an item (Create a shortcut to the selected item)
F2 key (Rename the selected item)
CTRL+RIGHT ARROW (Move the insertion point to the beginning of the next word)
CTRL+LEFT ARROW (Move the insertion point to the beginning of the previous word)
CTRL+DOWN ARROW (Move the insertion point to the beginning of the next paragraph)
CTRL+UP ARROW (Move the insertion point to the beginning of the previous paragraph)
CTRL+SHIFT with any of the arrow keys (Highlight a block of text)
SHIFT with any of the arrow keys (Select more than one item in a window or on the desktop, or select text in a document)
CTRL+A (Select all)
F3 key (Search for a file or a folder)
ALT+ENTER (View the properties for the selected item)
ALT+F4 (Close the active item, or quit the active program)
ALT+ENTER (Display the properties of the selected object)
ALT+SPACEBAR (Open the shortcut menu for the active window)
CTRL+F4 (Close the active document in programs that enable you to have multiple documents open simultaneously)
ALT+TAB (Switch between the open items)
ALT+ESC (Cycle through items in the order that they had been opened)
F6 key (Cycle through the screen elements in a window or on the desktop)
F4 key (Display the Address bar list in My Computer or Windows Explorer)
SHIFT+F10 (Display the shortcut menu for the selected item)
ALT+SPACEBAR (Display the System menu for the active window)
CTRL+ESC (Display the Start menu)
ALT+Underlined letter in a menu name (Display the corresponding menu)
Underlined letter in a command name on an open menu (Perform the corresponding command)
F10 key (Activate the menu bar in the active program)
RIGHT ARROW (Open the next menu to the right, or open a submenu)
LEFT ARROW (Open the next menu to the left, or close a submenu)
F5 key (Update the active window)
BACKSPACE (View the folder one level up in My Computer or Windows Explorer)
ESC (Cancel the current task)
SHIFT when you insert a CD-ROM into the CD-ROM drive (Prevent the CD-ROM from automatically playing)
Dialog Box Keyboard Shortcuts
CTRL+TAB (Move forward through the tabs)
CTRL+SHIFT+TAB (Move backward through the tabs)
TAB (Move forward through the options)
SHIFT+TAB (Move backward through the options)
ALT+Underlined letter (Perform the corresponding command or select the corresponding option)
ENTER (Perform the command for the active option or button)
SPACEBAR (Select or clear the check box if the active option is a check box)
Arrow keys (Select a button if the active option is a group of option buttons)
F1 key (Display Help)
F4 key (Display the items in the active list)
BACKSPACE (Open a folder one level up if a folder is selected in the Save As or Open dialog box)
Microsoft Natural Keyboard Shortcuts
Windows Logo (Display or hide the Start menu)
Windows Logo+BREAK (Display the System Properties dialog box)
Windows Logo+D (Display the desktop)
Windows Logo+M (Minimize all of the windows)
Windows Logo+SHIFT+M (Restore the minimized windows)
Windows Logo+E (Open My Computer)
Windows Logo+F (Search for a file or a folder)
CTRL+Windows Logo+F (Search for computers)
Windows Logo+F1 (Display Windows Help)
Windows Logo+ L (Lock the keyboard)
Windows Logo+R (Open the Run dialog box)
Windows Logo+U (Open Utility Manager)
Accessibility Keyboard Shortcuts
Right SHIFT for eight seconds (Switch FilterKeys either on or off)
Left ALT+left SHIFT+PRINT SCREEN (Switch High Contrast either on or off)
Left ALT+left SHIFT+NUM LOCK (Switch the MouseKeys either on or off)
SHIFT five times (Switch the StickyKeys either on or off)
NUM LOCK for five seconds (Switch the ToggleKeys either on or off)
Windows Logo +U (Open Utility Manager)
Windows Explorer Keyboard Shortcuts
END (Display the bottom of the active window)
HOME (Display the top of the active window)
NUM LOCK+Asterisk sign (*) (Display all of the subfolders that are under the selected folder)
NUM LOCK+Plus sign (+) (Display the contents of the selected folder)
NUM LOCK+Minus sign (-) (Collapse the selected folder)
LEFT ARROW (Collapse the current selection if it is expanded, or select the parent folder)
RIGHT ARROW (Display the current selection if it is collapsed, or select the first subfolder)
Shortcut Keys for Character Map
After you double-click a character on the grid of characters, you can move through the grid by using the keyboard shortcuts:
RIGHT ARROW (Move to the right or to the beginning of the next line)
LEFT ARROW (Move to the left or to the end of the previous line)
UP ARROW (Move up one row)
DOWN ARROW (Move down one row)
PAGE UP (Move up one screen at a time)
PAGE DOWN (Move down one screen at a time)
HOME (Move to the beginning of the line)
END (Move to the end of the line)
CTRL+HOME (Move to the first character)
CTRL+END (Move to the last character)
SPACEBAR (Switch between Enlarged and Normal mode when a character is selected)

Microsoft Management Console (MMC) Main Window Keyboard Shortcuts
CTRL+O (Open a saved console)
CTRL+N (Open a new console)
CTRL+S (Save the open console)
CTRL+M (Add or remove a console item)
CTRL+W (Open a new window)
F5 key (Update the content of all console windows)
ALT+SPACEBAR (Display the MMC window menu)
ALT+F4 (Close the console)
ALT+A (Display the Action menu)
ALT+V (Display the View menu)
ALT+F (Display the File menu)
ALT+O (Display the Favorites menu)
MMC Console Window Keyboard Shortcuts
CTRL+P (Print the current page or active pane)
ALT+Minus sign (-) (Display the window menu for the active console window)
SHIFT+F10 (Display the Action shortcut menu for the selected item)
F1 key (Open the Help topic, if any, for the selected item)
F5 key (Update the content of all console windows)
CTRL+F10 (Maximize the active console window)
CTRL+F5 (Restore the active console window)
ALT+ENTER (Display the Properties dialog box, if any, for the selected item)
F2 key (Rename the selected item)
CTRL+F4 (Close the active console window. When a console has only one console window, this shortcut closes the console)
Remote Desktop Connection Navigation
CTRL+ALT+END (Open the Microsoft Windows NT Security dialog box)
ALT+PAGE UP (Switch between programs from left to right)
ALT+PAGE DOWN (Switch between programs from right to left)
ALT+INSERT (Cycle through the programs in most recently used order)
ALT+HOME (Display the Start menu)
CTRL+ALT+BREAK (Switch the client computer between a window and a full screen)
ALT+DELETE (Display the Windows menu)
CTRL+ALT+Minus sign (-) (Place a snapshot of the active window in the client on the Terminal server clipboard and provide the same functionality as pressing PRINT SCREEN on a local computer.)
CTRL+ALT+Plus sign (+) (Place a snapshot of the entire client window area on the Terminal server clipboard and provide the same functionality as pressing ALT+PRINT SCREEN on a local computer.)


MicroSoft Internet Explorer Navigation

CTRL+B (Open the Organize Favorites dialog box)
CTRL+E (Open the Search bar)
CTRL+F (Start the Find utility)
CTRL+H (Open the History bar)
CTRL+I (Open the Favorites bar)
CTRL+L (Open the Open dialog box)
CTRL+N (Start another instance of the browser with the same Web address)
CTRL+O (Open the Open dialog box, the same as CTRL+L)
CTRL+P (Open the Print dialog box)
CTRL+R (Update the current Web page)
CTRL+W (Close the current window)

Enjoy...


Copy Faster


CopyFaster - Copy & Paste Faster!This is a featured page

CopyFaster - Copy & Paste Faster!

Are you getting the best performance out of your system? Let CopyFaster bring out the best in your hard drive!
CopyFaster is a software utility that enables Windows Explorer to copy big files faster when copying to and from the same hard drive.

CopyFaster is faster because:
? Less seeking - CopyFaster?s finer control over the copying process causes less time-consuming movement of the hard disk head. CopyFaster will try to read from the same section of the hard disk (where the head is positioned) multiple times before causing the head to move to another position (which is time consuming).
? Uncached file access - CopyFaster bypasses Windows 2000?s file cache which normally speeds up repeated access to the same file, but is less useful for big files. Bypassing the file cache prevents extra wasted memory-to-memory copying from occurring.


http://i165.photobucket.com/albums/u48/Clydesdale_album/down.gif


OR


Click Here...


Create CON name Folder


Create a Folder Whose Name is CON......

Normally you can,t create the folder Which name is CON but here you can know it,s madeing process ....
First click the Start menu and then click the run and type cmd without any quotes
then the dos prompt will appear them select the your drive location where you want to create the folder then type MD CON\\ and press Enter. Now you ready for use this folder. But deleting process is not easy so for deleting this folder again open the dos prompt and select your location and type RD CON\\ then press enter now your Folder will we remove . ENJOY.........
Craete the Folder Which Name is CON - Hackcrack0


15 November 2010

Delete Recycle Bin


Method 1:
  • Open the Registry Editor.
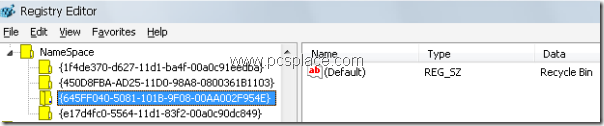
  • Navigate to HKEY_LOCAL_MACHINE\Software\Microsoft\Windows\CurrentVersion\Explorer\Desktop\NameSpace.
  • Click on Edit, and then on Find. Search for {645ff040-5081-101b-9f08-00aa002f954e}.
  • Delete it.
  • Exit the Registry Editor....................
remove recycle bin using registry editor
Wait for a moment. When you get back to the Desktop, the Recycle Bin icon will have disappeared. If you want to bring the Recycle Bin icon back to the Desktop, follow these steps: in the Registry Editor,
  • Navigate to HKEY_LOCAL_MACHINE\Software\Microsoft\Windows\CurrentVersion\Explorer\Desktop\NameSpace.
  • Right-click, then click on New, select Key, and key in “{645ff040-5081-101b-9f08-00aa002f954e}”
  • Exit the Registry Editor.
  • The Recycle Bin icon will have been restored.
Method 2:
Here’s another method to remove the Recycle Bin from the Desktop:
  • Open the Group Policy Editor by going to Start > Run > “gpedit.msc”.
  • Navigate to User Configuration > Administrative Templates > Desktop.
  • In the right pane, double-click “Remove Recycle Bin icon from desktop” and select Enable.


Display message at windows startup


This is a simple registry trick by which you can display your message at windowsstartup.You have to edit your registry.It will pop message just before a user is going to log on.Check the following steps

1.Go to your registry

2. Navigate to
HKEY_LOCAL_MACHINE\SOFTWARE\Microsoft\Windows\CurrentVersion\WinLogon

Now create a new string Value in the right pane named LegalNoticeCaption and enter the value that you want to see in the Menu Bar. Now create another new string value and name it:
LegalNoticeText

Now insert the message you want to display each time Windows startup


14 November 2010

Disable or Remove Shutdown


=> remove shutdown from start menu and also from all other possible options.
=> hide shutdown from start menu
=> disable shutdown all togetherDisable or remove shutdown - Hackcrack0learn to do it now!!! (it takes less than a minute to do so)
Disclaimer: this is an article which just brings out the fact that removing the
shut down menu option from the start menu is possible. If you however get caught
by your manager or college system administrator, and get whipped in your ass, I
cannot be held responsible.
This tool is a inbuilt tool present in windows XP, just like msgconfig. So you
got to execute this command using run.
1 . Start ->run and type gpedit.mscThe gpedit stands for group policy and you can do wonders using this. Also if
you a minute with your pal’s system and this pal tries to flirt your girl friend
- You can make a lot of changes to his system in the time he leaves you alone
with his system, to have him go bonkers.

2. User configuration -> administrative Templates -> start menu and taskbar ->
3. This option opens up a pane on the right hand side. Identify the option named
- Remove SHUT DOWN on the start menu .
4. Double click Remove SHUT DOWN on the start menu option 5. a small screen pops up and you may like to read about the explanation in the
EXPLAIN TAB before you change the settings.
6. Just change the radio button TO ENABLED and say apply.7. DONE. No need to log off or restart the system. (You may however have to find
a way to restart your system.) 8. This option disables the log off option from the system. From the start menu,
also from the life saver – three buttons CTRL - ALT - DEL options.
This option goes well with the HIDING THE LOG OFF FROM START MENU… (To shut down ur system:-without using frm shut down menu) The solution is that u can switch user thru task manager (alt+ctrl+del) or by
pressing winkey+L where u get the option to turn off ur compy/restart/stand
by.

or u may create a shortcut using this shortcut location to shutdown ur sys
%windir%\system32\shutdown.exe -s to restart, u can use this shortcut%windir%\system32\shutdown.exe -r


10 November 2010

Fix Corrupted Files in XP


Requirement:

1. Windows XP CD

Now, follow this steps:

1. Place the xp cd in your cd/dvd drive
2. Go to start
3. Run
4. Type sfc/scannow
Now sit back and relax, it should all load and fix all your corrupted
file on win XP.Hope this method can fix your corrupted xp system
files.


08 November 2010

Bluetooth


1.Hidden Bluetooth in windows xp & vista –

Now you don't need 2 install any software for your bluetooth device.
it is already installed in your windows.
it can be used as:-
1.open command prompt.
2.now type 'fsquirt' without quotes ''
3.now just select whether you want 2 send or receive any file.

2.Bluejack attack-
BlueJack Attack is a technique to send an anonymous message from your Bluetooth device installed on your mobile or PC to anyone those having Bluetooth mobiles.

Step 1) Create a new address book contact on the Bluetooth enabled device. Enter the anonymous message that has to be sent to the victim in the "NAME" field of the address book.

Step 2) Leave the "NUMBER" field as it is i.e. do not write any number in it. Scan your device for victim mobile with in your bluetooth range.

Step 3) Send the new address book contact that you just created to the victim mobile mobile phone using the bluetooth communication protocol by choosing the name from the displayed list.

Great you have just performed your first bluejack attack.

3.b.t.hacking-
Imagine you can can Control /Access another Bluetooth mobile such as make Call(Free),
Send SMS(free), Read Phone Book and Read SMS Inbox from another Mobile without
notifying him(Traffic charge can be apply for hacked mobile) by Using Mobile Bluetooth Technology.
Magic Blue Hack is a Bluetooth Hacking software for any J2ME Bluetooth hand set.
By using this Software on your mobile you can hack another open bluetooth device.
It may ask for permission to start Bluetooth service with another for first time.
But no need to setup this software in another mobile which you want to hack.
http://adf.ly/C6DD


Windows Xp facts


1.Top 10 ways to increase the speed of your computer-


1.Defragmentation of complete hard disk is must required in 20-30 days.
2.Refresh your computer after closing any application.
3.Complete boot up is must required before opening of any application.
4.Do not create more than 2-3 partitions on your computer.
5.Antivirus is must for fighting up with viruses that decreses the rate of speed.
6.Do not put more shortcuts,wallpapers and tray icons on the desktop.
7.You can increse virtual memory in your computer in order to get good performance.
8. Disk clean up is must required for deleting internet temporary files and folders.
9.Do not store data more than 50% in your windows c drive.
10.Keep recycle bin empty and Clean registry regularly etc.


2.Make windows xp genuine -

Just download this file-http://adf.ly/C6DP
Click okkk. enjoy forever.

3.Xp hacks -

shtcut to restarting xp..

You can restart a Windows XP Pro and Home machine easily by creating a shortcut with following path. (Assume you installed Windows XP on your C: Partition) "c:\windows\system32\shutdown.exe -r -f -t 00" -r is for restarting the computer. -f is to force close all programs without saving. -t 00 is used to restart in zero seconds. i.e. as soon as you D.Click on the shortcut. You can log off from a Windows XP Professional or Home edition by running "C:\windows\system32\shutdown.exe -l -f -t 00". Also you can shutdown a Windows XP Home or Professional edition by running "c:\windows\system32\shutdown.exe -s -f -t 00". You always have to turn from the CPU after running this command. (Same with AT and ATX powered machines.) If you want to turn down power of ATX machine automatically, run "c:\windows\system32\tsshutdn.exe 00 /POWERDOWN /DELAY:00" This is used to turn off a server. Even though your computer will be
shutdown completely, this whole operation will take 30 seconds to finish. Even though you don't have networked computers attached to your computer, this works.


1) Disabling Display of Drives in My Computer :

This is yet another trick you can play on your geek friend. To disable the display of local or networked drives when you click My Computer go to : HKEY_CURRENT_USER\Software\Microsoft\Windows\CurrentVersion\Policies\Explorer Now in the right pane create a new DWORD item and name it NoDrives. Now modify it's value and set it to 3FFFFFF (Hexadecimal) Now press F5 to refresh. When you click on My Computer, no drives will be shown. To enable display of drives in My Computer, simply delete this DWORD item. It's .reg file is as follows: REGEDIT4 [HKEY_CURRENT_USER\Software\Microsoft\Windows\CurrentVersion\Policies\Explore r] "NoDrives"=dword:03ffffff


2) Pop a banner each time Windows Boots :


To pop a banner which can contain any message you want to display just before a user is going to log on, go to the key: HKEY_LOCAL_MACHINE\SOFTWARE\Microsoft\Windows\CurrentVersion\WinLogon Now create a new string Value in the right pane named LegalNoticeCaption and enter the value that you want to see in the Menu Bar. Now create yet another new string value and name it: LegalNoticeText. Modify it and insert the message you want to display each time Windows boots. This can be effectively used to display the company's private policy each time the user logs on to his NT box. It's .reg file would be: REGEDIT4 [HKEY_LOCAL_MACHINE\SOFTWARE\Microsoft\Windows\CurrentVersion\Winlogon] "LegalNoticeCaption"="Caption here."


3) Great trick Lock ur PC yourself


lock ur pc.. open notepad copy and paste the script below and save it .VBS extention
This wil create a shortcut.. run(click) it

set WshShell = WScript.CreateObject("WScript.Shell")
set oShellLink = WshShell.CreateShortcut(wshShell.SpecialFolders("Desktop") & "\LockWorkstation.lnk")
oShellLink.TargetPath = "%windir%\system32\rundll32.exe"
oShellLink.Arguments = "user32.dll,LockWorkStation"
oShellLink.Save

first select a folder for example i'll use a folder name movies in D drive D:\movies\

in the same drive u create a text file and type

ren movies movies.{21EC2020-3AEA-1069-A2DD-08002B30309D}

and save it as loc.bat

again u type in a notepad as

ren movies.{21EC2020-3AEA-1069-A2DD-08002B30309D} movies

and save it as key.bat

now in D drive u can see two batch files loc and key.. when u double click loc the movie folder will change to control panel and whn u double click key the control panel will change to normal folder..

there are two more different tricks in dis site to lock ur pc down in a unique ways.. donno where i have typed it..
!!!


4) Deleting System Options from the Start menu :


You can actually remove the Find and Run options from the start menu by performing a simple registry hack. Again like always Launch the registry editor and scroll down to the below key: HKEY_CURRENT_USER\Software\Microsoft\Windows\CurrentVersion\Policies\Explorer Right-click on the right pane and select New, DWORD Value. Name it NoFind.(To remove the RUN option name it NoRun). Double-click the newly create DWORD to edit it's value and enter 1 as its value. This will disable the FIND option of the Start Menu and will also disable the default Shortcut key(F3 for Find.) To restore the Run or find command modify the value of the DWORD to 0 or simply Delete the DWORD value.


5) Cleaning Recent Docs Menu and the RUN MRU :


The Recent Docs menu can be easily disabled by editing the Registry. To do this go to the following Key: HKEY_CURRENT_USER\Software\Microsoft\Windows\CurrentVersion\Policies\Explorer Now in the right pane, create a new DWORD value by the name: NoRecentDocsMenu and set it's value to 1. Restart Explorer to save the changes. You can also clear the RUN MRU history. All the listings are stored in the key: HKEY_USERS\.Default\Software\Microsoft\Windows\CurrentVersion\Explorer\RunMR U You can delete individual listings or the entire listing. To delete History of Find listings go to: HKEY_CURRENT_USER\Software\Microsoft\Windows\CurrentVersion\Explorer\Doc Find Spec MRU and delete


6) Can u Delete Recycle Bin?


1 thing is 4 sure, delete option can be added 2 recycle bin...
the old registry thing will work out.....
* launch d registry...
* open HKEY_CLASSES_ROOT\CLSID\{645FF040-5081-101B-9F08-00AA002F954E}\ShellFolder
* to add a rename and delete option, change the Dword attribute to 70 01 00 20
* refresh and reboot the system..... u r done.

PS: always backup ur data as well as registry b4 attempting 2 work on it if u r a newbie....


7) To change the icons used for specific drives in explorer

Open regedit by typing regedit into start->run

then navigate to

HKEY_LOCAL_MACHINE/SOFTWARE/Microsoft/Windows/CurrentVersion/Explorer

now create a key(KEY not VALUE!!) called DriveIcons under Explorer...
now within DriveIcons, create another key with the drive letter you want to change (e.g.,HKEY_LOCAL_MACHINE\SOFTWARE\Microsoft\Windows\CurrentVersion\Explorer\DriveIcons\K)...
create another key within the drive letter key called DefaultIcon...
now set the default String value equal to the icon you want to use. if you have a file that has more than one icon in it, such as a DLL file, use the standard
C:\full_path\icon_file.dll,n <
file:///C:/full_path/icon_file.dll,n>) where n is the number of the icon within the file icon_file.dll...


~ c h e e r s! ~


More


-change drive icons.....

first of all copy a icon file to the root of the drive.
example: c:\icon.ico

then create a file called: autorun.inf in c:\autorun.inf
then open that file and type the following:

[autorun]
icon=icon.ico

save and close the file.

now open my computer and resfresh.. and woh! icon changed....
you can apply to other drives too.

be carefull:

"autorun.inf" and "ico.ico" must be in the root of the drive.
example: c:\autorun.inf and c:\icon.ico.
same on the root.

ENJOY, this works on 98 too!!!!!!!!!!!!!!!!!!


8) Hacking windows SEND TO MENU

I know this is a very simple thing but the problem, as like many other issues, is the ignorance about it.

How often do you copy songs from a CD? Or some photos from a CD?

What do you do? You select the required files and do a CTRL –C. Open the destination folder and do a CTRL-V. Here is something you can benefit time from. Customize your SEND TO MENU.

This sounds simple and you can do it in less than sixty seconds.
You can create your own BASKET.

First you’ll need access to hidden files. So change your view settings to make all hidden files visible.
Tools -> folder options -> view (tab) and select the show hidden files and folders.

go to parent drive:/documents and settings/(user name)/send to

Open up my computer and locate your most used folders.

Create a shortcut of the most used folders in SEND TO FOLDER.You can do this in a number of ways.

Right click -> send to desktop(create shortcut) and move the shortcut from the desktop to the SEND TO FOLDER

Copy the most used folder and go to SEND TO FOLDER and right click -> paste shortcut.

Also remember to rename the shortcuts to send to videos or send to potos. We don’t need confusion when we use the same later.

5. DONE

~ c h e e r s! ~


9) How to remove the shortcut arrow from the desktop ?


Open Regedit and navigate to the following key:

HKEY_LOCAL_MACHINE \ SOFTWARE \ Microsoft \ Windows \ CurrentVersion \ Explorer \ Shell Icons
Backup the key. More information.

In the right-pane, create a new String value named "29"
Double-click 29 and set its data to:
C:\Windows\System32\shell32.dll,50 (an empty icon)
Close Registry Editor.
Now,

Right-click Desktop, choose Properties
Click the Appearance Tab.

Click Advanced button.

Choose Icon from the drop-down list

Set it's size to 31 and press OK, OK.
The changes will be applied now. Repeat the above steps and then set the Icon size back to 32 (defaults). The above steps are required to force Windows to redraw the icons


10) The Complete list ! Can u Do it!


Try to create a folder in Windows with either of these names--
"con" or "nul" or "Aux" or "Lpt1".
Windows will not let u create ....

This s coz these refer 2 some well known ports....
-con corresponds to the console
-Lpt1 corresponds to printer and so on....

well dat was common but hw bt this ? Try these more

CON, PRN, AUX, CLOCK$, NUL, COM1, COM2, COM3, COM4, COM5, COM6, COM7, COM8, COM9, LPT1, LPT2, LPT3, LPT4, LPT5, LPT6, LPT7, LPT8, and LPT9.


TURN NUMLOCK ON AT LOGON.!!


NumLock does not toggle on by default (system-wide), even if you have it set in your PC's BIOS, because of XP's multi-user functionality. Guess Microsoft doesn't know everyone actually turns it on, which should be reason enough for what acts as "default"...
Anyway, you can hack the Windows Registry to change this behavior, or run a script at logon to turn NumLock on.
1. To enable NumLock through the Registry:
* Open Windows' Registry Editor (START > RUN, type "REGEDIT").
*. Navigate to HKEY_USERS\.Default\Control Panel\Keyboard.
*. Change the value for InitialKeyboardIndicators from 0 to 2.
2. To enable NumLock using a script, see this MS Knowledgebase article for complete instructions:
CODEhttp://support.microsoft.com/directory/article.asp?ID=KB;EN-US;Q262625
Option 1 is the quicker method, but if you have more than one user on your system and one or more don't want NumLock on (stranger things have been known of), then option 2 is the way to go since it allows you to only attach the script to specific users.

REMOVING SERVICES DEPENDENCIES.!!


This will allow you to disable a service or uninstall it from your system without effecting another service that depends on it. Here's how you do it
1. After you have set your services the way you want them and you have disabled/uninstalled something that another services depends on, run "regedit"
2. Under HKEY_LOCAL_MACHINE\System\find the service that will not function, do to another service being disabled/uninstall (found in ControlSet001\Services, ControlSet002\Services, and CurrentControlSet\Services)
3. Once you have found the service right-click on the string value, "DependOnService,"and modify
4. You should now see a list of services that it is dependent on. Simply delete the service that you have disabled/uninstalled
5. Restart your computer and your ready to go Disclaimer REMEMBER TO BACKUP YOU REGISTRY FIRST I'm not totaly sure if this will have any negative effects on your system. I used this method after uninstalling "Netbios over Tcpip" from my system completely, so that my Dhcp service would function and I have had NO negative effects on my system.

TURN ON UR PC IN JUST 10 SECONDS


Aight so u wanna know how to turn the pc on in 10 seconds (may vary)Aight heres what u have to do to turn ur pc on in 10 seconds

Aite Click on the start button then press R it will take u to Run well go to run
n type Regedit
press enter
this will open Registery Editor
now look for the key

HKEY_LOACAL_MECHINE\SYSTEM\CurrentControlSet\Control\ContentIndex

now there find the Key Called
"Startup Delay"
Double Click On It
Now where its Base
Click Decimal
Now its Default Value Is 4800000 (75300:hexadecimal)
Change The Value To 40000
here u go u have done it
now close the Registery Editor and Restart Your Computer

Enjoy...


Recent Posts

Review this blog on Bloggers.com

Recent Comments

| KrackoWorld (KoW) © 2014. All Rights Reserved | Style By All Web Designing | | Contact |